4. Brew & Save#
— Pinia
In this homework, you will extend your previous project Custom Drink Maker by building a new version with enhanced state management and user interaction. The goal is to implement a feature that allows users to create, name, store, and visualize their own beverage recipes using Pinia.
4.1. Objectives#
Pinia Integration: Implement Pinia to manage and store the state of user-created beverage recipes.
User Interaction: Enhance the user interface to allow users to create and view beverage combinations easily.
4.2. Best Solutions#
Section 01
Section 02
4.3. Instructions#
Accept your instructor’s GitHub Classroom invitation to create your project repository.
Project Initialization:
Copy all necessary code (excludingbeverage.ts) from your previous homework “Custom Drink Maker” into thesrc/folder to ensure that all components function correctly and beverages are rendered as expected.Pinia Store Integration:
Complete the Pinia store filebeverageStore.tsunder thestores/directory.Import ingredient data (bases, creamers, syrups, and temperatures) from the
data/folder.This store should manage the application state, replacing the logic previously implemented in
beverage.ts.The store must also support temporarily saving all user-created beverage recipes.
Interface Enhancement:
InApp.vue, add a text input labeled"Name"and a button labeled"Make Beverage".Implement a
makeBeverage()action in the Pinia store.Bind this action to the
"Make Beverage"button so that when clicked, it creates a new beverage recipe using the current selections and stores it in thebeverageStore.
Display Recipes:
Inside the<div id="beverage-container">, display a list of all saved beverages from thebeverageStore.Each beverage should be shown as a clickable button or radio input with its corresponding name.
Implement a
showBeverage()action in the store to update the mug display according to the selected beverage.When a beverage name is selected, this mug should reflect the chosen beverage.
4.4. Expected Outcomes#
Focus on implementing the functionalities; the aesthetic design of the radio button list, text box, and button is secondary.
4.5. Grading Rubrics#
Grading Item |
Points |
|---|---|
Task 1: Project Initialization |
10 |
Task 2: Implementation of Pinia Store |
25 |
Task 3: User Interface and Interaction Enhancement |
25 |
Task 4: Display and Interaction with Stored Recipes |
30 |
GitHub Clone, Commit, Push, & Deploy to GitHub Pages |
10 |
4.6. Deliverables#
Deploy your web application using the following commands in your
terminal:npm run build npm run deploy
Github Page Setup
Set up your GitHub repository for GitHub Pages deployment. Follow the steps shown in the image below:
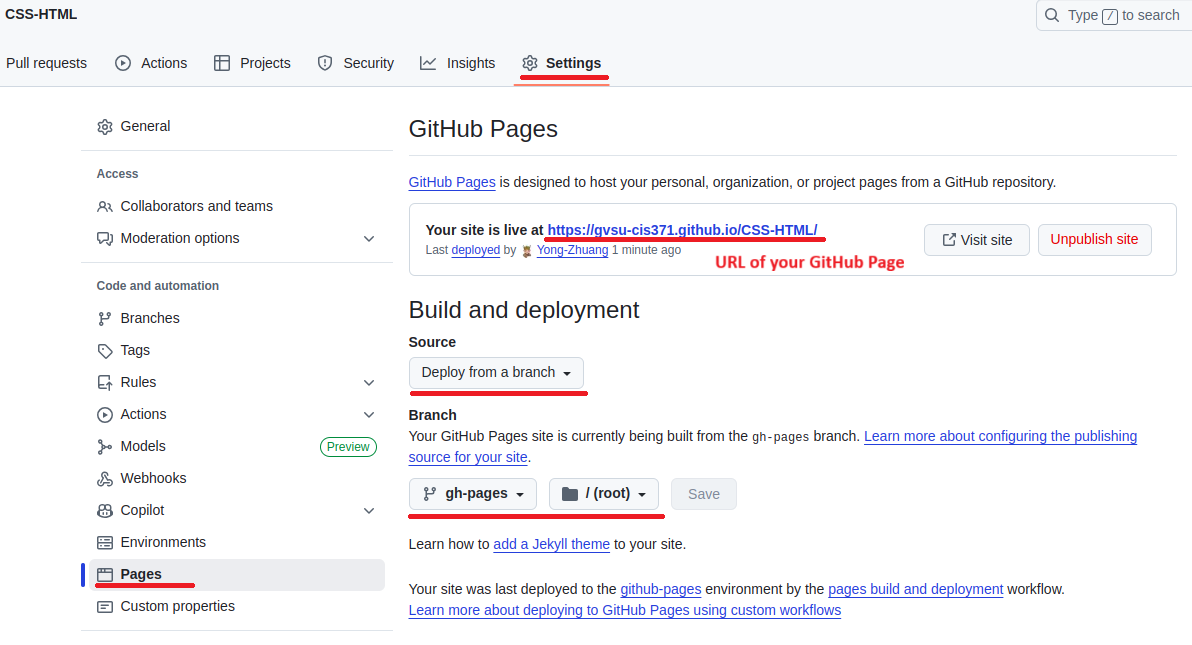 .
.Your web application will be accessible at the URL: gvsu-cis371.github.io/YOUR-REPO
Submit the URL of your GitHub Page in Blackboard.